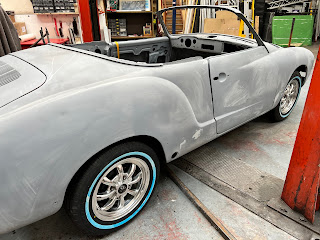
Following my last blog, I decided that I had to put the body back on the chassis to ensure that the new wheels would fit under the wings, before I sent it off for painting. So I had to devise a way of lifting the body onto the chassis on my own.
Now the chassis could be positioned in exactly the right place, using the stands on castors, and the body slowly lowered into position.
Now with the body on the chassis, I could try fitting the new wheels and tyres and, at last, some good news. The wheels fit!! Brilliant. So now I can take the body off again, put it back on the rotating spits and get it off for painting.
The front bonnet release posed another problem, as the bonnet release lever is mounted on the glove box and, as you can see, the glove box was beyond help.
So the Karmann Ghia body finally went off for paint in February 2022 and that gave me the opportunity to do some other small jobs ready for when it returns.
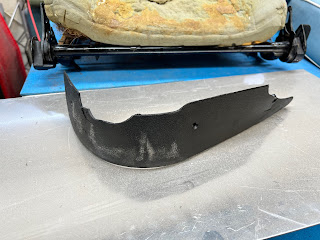
The first was the seats. I wanted to fit them to the rails on the chassis and make sure that they slide and adjust correctly. Well this was great and they slid on quite easily and adjusted fine. However I then noticed that the two black plastic kick guards on the bottom of the seats were both broken.
So I tried to buy some new ones with no success, I looked on all the web sites world wide, but no one had any. So I decided to make some out of aluminium.
What do you think?
The next job was the Tow Bar. It is my intention tow my box trailer with the Karmann, when it is done, to allow me to take my bikes and the car to vintage shows and show them all. Well getting a tow bar was difficult, but I finally manged to buy one for a beetle. Now once the body is back on the chassis, I will probably have to cut the ball off the bar and extend it to reach the back of the Karmann. However, in the mean time I needed to manufacture the fixings for the tow bar which did not come with it. So I made two new "U" bolts to fit over the torsion tubes and two heavy right-angle brackets for the gearbox mounts.
So I had to track down another man who could finish the car and arrange to deliver it to him. So on 17th September 2022 the Karmann body went, on the relay truck again, to the second painter, called "Coolblu" in Swadlingcote.
In the mean time, I decided that it would be a good idea to change the generator, on the engine, for an alternator. So I bought the kit and set about fitting it. As you can see, this went well, and apart from having to cut a small boss off the oil filler stand, it fitted perfectly.
On the next blog, I hope to have the body back on the chassis.
Copyright 16.11.22 all rights reserved.
My Other Blogs:
1961 BSA A10 Super Rocket Motorcycle:
http://60sclassicmotorbikes.blogspot.com/2012/07/before.html
1961 Ariel Arrow Super Sport Motorcycle :
http://60sclassicmotorbikes.blogspot.com/2014/01/1961-aerial-golden-arrow-restoration.html
Miniature Land Rover Defender:
http://miniaturelandrover.blogspot.com/2016/02/1-miniature-land-rover-defender-idea.html?view=timeslide
Motorcycle Trailers / Caravans:
http://motorcycletrailersandcaravans.blogspot.com/2018/01/1-motorcycle-trailers-problem.html


