Tuesday 2 April 2024

27. Karmann Gian Restoration - Doors & Engine


Now for those of you that have assembled a Karmann Ghia's doors before, you will cringe as I start this rebuild as I did it all in the wrong order. But you only learn by trying!. 


So the first job was to dig out the window mechanisms and clean off 53 years of dirt and grime. Then treat all unplated parts with rust killer and lubricate all the moving parts. It was then a case of offering the mechanism into the door and bolting it in place. 

I then tried to offer the glass into the door and it will only go in one way and that is down through the slot in the top of the door. Well somehow I had managed to get the glass out of the door, when I stripped it, without removing the metal carrier on the bottom of the glass, but it was quite obvious now that there was no way that it would go back in like that. The slot was now too small to allow it to pass through. So I had to figure how to remove the carrier without breaking the glass. This was achieved with lots of WD40 and very gentle levering. I could then mount the carrier onto the mechanism and then lower the glass down through the slot and back into the carrier.


It was now a case of lining up the four fixing bolts and clamping the glass carefully in place. I now fitted the guide rubber to the windscreen pillar and then wound up the window and had to loosen all the fixings again to allow the angle of the glass to be adjusted until it sat in the rubber correctly and then re-tighten them.


Now this is where the fun really began! I fitted the inner wiper strip without too much trouble but then tried to fit the anti-rattle rubbers. There are seven on each door and of all the jobs that I have done on the car this has been the hardest. These rubbers fit into the outer skin of the door, inside the slot. You can't reach them or re-drill them and the only way I could attempt to fit them was to pass the rubber down through the slot with a pointed pair of pliers and then try and push them into the holes with a small screwdriver. 


This takes immense patience, I even went to the trouble of making a special tool to try and insert them.       


It didn't work! and it took me over three weeks and 21 rubbers before I managed to get only 5 rubbers into each door. If I had realised how difficult these were, I would have fitted them when I had the doors cut open and before it was sprayed . But you live and learn.

Now the other thing that I discovered when cleaning the windows was that the driver's door window was badly scratched due to being wound up and down without any rubbers in place and after finding that having the glass re-polished was more expensive than buying a new one, I bought a new one and had to strip the door again to fit it.


The final job was to fit the outer scraper strips. I had to wait weeks before the new fixing clips arrived and then managed to break three whilst trying to fit the strip incorrectly. I thought that the rubber sat on top of the door and pressed up against the metal strip between it and the glass. I eventually discovered that the rubber fits "over" the metal strip allowing the clips to snap in easily.


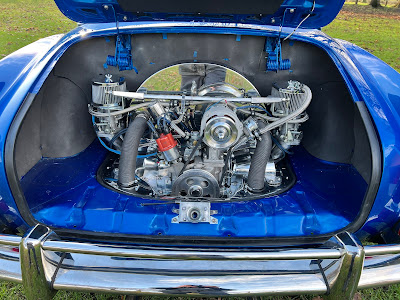
Now the good bit. It's time to fit the engine.  This involved removing the carburettors and manifolds and the heater pipes and the front tray. It was more difficult to fit than expected as the new sports exhaust hit the underside of the bumper preventing it from seating correctly on the bell housing. I eventually modified the exhaust to give it some clearance and in it went. The carburettors went back on along with the heater pipes and rear tray and with the electrics and petrol connected it was time to see if it goes?


The final touch was to fit the steering wheel. This involved finding the old steering wheel and removing the associated parts that operate the indicators auto cancel and transfer them onto the new wheel. This involved drilling and tapping the new wheel to get the parts in the right place, but it worked and also extend the wire to the horn button. But it worked and the new steering wheel fit beautifully.


On the next blog I'll be fitting the door weather seals and fitting a couple of beautiful old badges that friends have given me.
         

Copyright 02.04.24 all rights reserved.

My Other Blogs:
1961 BSA A10 Super Rocket Motorcycle:
http://60sclassicmotorbikes.blogspot.com/2012/07/before.html

1961 Ariel Arrow Super Sport Motorcycle :
http://60sclassicmotorbikes.blogspot.com/2014/01/1961-aerial-golden-arrow-restoration.html

Miniature Land Rover Defender:
http://miniaturelandrover.blogspot.com/2016/02/1-miniature-land-rover-defender-idea.html?view=timeslide

Motorcycle Trailers / Caravans:
http://motorcycletrailersandcaravans.blogspot.com/2018/01/1-motorcycle-trailers-problem.html


Tuesday 30 January 2024

26. Karmann Ghia Restoration - Dashboard and Hood Frame


Well this is the point at which I make a bad decision and without studying the dashboard too closely, I decided to start building the dashboard.  So after fitting and wiring the switches I decided to fit a new cigarette lighter. I managed to buy a suitable replacement for the original, that was missing, and offered it to the hole in the dash, only to find that the hole was too small. I was now faced with the problem, how to make the hole bigger? Now obviously I could try using a hand file, but the bezel was only 1mm wide and I would need to be very accurate. Plus I wanted the hole exactly central to the existing one. So I bought a 24mm Q-Max cutter and then set about making a spacer, to fit the hole in the dash, with a hole in the middle for the cutter bolt to pass through. This spacer then held the cutter exactly in the centre of the hole in the dash. Then with masking tape, to stop the cutter marking the dashboard paint, I cut the hole and it was perfect.

The next job was to renovate the clocks and as soon as I put them on the bench I noticed that I had two clocks with grey faces and one with a black face. The time clock was definitely an odd one out. Well I searched the web for a "grey" clock but could not find one anywhere. But eventually I found a grey faced Rev Counter of the correct size and purchased that. The next job was to strip and clean the speedo and fuel gauge. Removing the bezels and glass was a slow and delicate operation 
without breaking the glass  but the result was excellent and they now look beautiful. 

At this point I still hadn't realised the mistakes I was making, but it is visible in this picture. So Now I decided to buy the upper and lower dash pads. I had to wait some time for the top pad to arrive from the USA and the bottom pad came from Germany.

In the mean time I could fit the radio. This is a replica vintage look radio with DAB, USB and Bluetooth with four speaker outputs and a separate feed for a sub speaker.


Well my dashboard pads arrived and as soon as I offered them up to the dashboard my mistake was obvious. The holes at the top left and right on the dashboard were still visible below the pads. Plus more slots on the far right and left. I had mistakenly thought that the pads would cover these holes and I was wrong. I had really wanted to keep the blue painted dash. But now I had no choice. The whole dashboard had to be stripped again and I had to order the wood laminate facia. 

So while I waited for the dash facia to arrive, I decided it was time to fit the windscreen. You will have read that I broke the original screen getting it out. So I now had a new screen, new rubber and new chrome trims. Now I have a very good friend who used to work for Autoglass as a fitter. So I asked him if he would help and he came along to the workshop. 


As usual, nothing is easy, we managed to get the new rubber around the glass but could not get the chrome trim to fit and after a whole night of trying, we gave up and went home. I spent the next few days reshaping the chrome trims (which come flat) to fit the shape of the screen and my friend returned for another attempt. Surprise surprise, it wouldn't fit on the car. The whole screen and rubber appeared bigger than  the aperture. In a final desperate attempt, I found the old, 50 year old, screen rubber and spent a whole day cleaning it up. My friend returned for a third attempt and this time, with the original screen rubber, it fit!


The wood laminate arrived and it was time to start reassembling the dash. With
 the laminate stuck in place with contact adhesive, I now had the job of cutting out all of the holes. The larger holes were not too difficult, using a sharp Stanley Knife to carefully cut around the hole. But the switch holes posed a small problem as some of them were not indented on the laminate. I ended up using a small drill from the other side of the dash to find the centre of the holes and then drilling from the front by hand with the correct size drill. 

After refitting all of the clocks and switches I could now fit the two new top and bottom pads. I had previously only laid them in place. It was now time to fit them properly. Well the first thing that I discovered was that the captive bolts on the bottom (German) pad were 6mm. No problem. However the bolts on the top (American) pad were imperial and after a lot of searching I discovered that they were 3/16" Whitworth, which of course, I didn't have!  This meant a trip to a local Nut and bolt company who fortunately found some and gave them to me (Thank you).  Getting the nuts onto these pads is extremely awkward and takes ages to do, but there it is, fitted!

So now a change of direction, as I was looking at how to fit the four loudspeakers for the radio. Now the rear speakers had to go into the rear plastic quarter panel interior trims and these trims were in really bad condition. They had become brittle and had much of the edges broken off and one trim was actually broken in half. I searched for new ones on the web and found that they were really expensive. So I decided to try and repair them. I backed each one with thin aluminium, held in place with epoxy resin and pop rivets. Hopefully, once they are trimmed with vinyl, they will look fine.

Now in order to fit these panels, the hood frame had to be in place first. So it was time to fetch the frame down from the loft and have a go at fitting it. I had previously stripped the frame and had it powder coated. So now was the time to fit it. Well it's really nice to have something go well for a change and the frame fitted easily and even the rear window catch worked correctly.


So next time I'll be reassembling the doors and fitting the engine.


Sunday 10 December 2023

25. Karmann Ghia Restoration - Lights, Horn & Screen Washer


Well wiring the headlight's was straight forward. I managed to renovate the original rubber tubes from the headlight bowls to the body and thread through the new wiring loom. Wiring them back to the fuse box and the switch wasn't too difficult but the headlight relay would flash the lights but not dip them. So in the end I had to buy a new relay. 


Now I had decided not to mount the Battery in the engine compartment. Instead I wanted to fit it under the back seat (Like in a Beetle). However the space under the back seat of a Karmann Ghia is not as deep as a Beetle and so I had to search for a suitable battery to fit the available space. Eventually I found that the battery for a Mercedes SL fit the space perfectly and here it is mounted in place.


The next job was to fit fit the horns. Now the original horns were long gone and the one I removed, when stripping the car, was just a single cheap plastic horn. I wanted to fit some "air horns" but this posed another problem. Without the original horns and rubber boot, how was I going to stop water coming in through the hole in the wheel well. So I experimented with very fine stainless steel wire mesh and found that if the mesh was fine enough, then the water would run off it rather than pass through it and the sound could still pass through it easily. So that's what I fitted, held in place with black body sealant. New air horns were fitted along with the compressor and a relay and wired back to the steering column. Oh boy! they sound loud and great.


The next task is to convert the washers to electric operation. This involved removing the air switch from the back of the wiper switch and devising a mounting for a micro-switch to trigger the electric pump. I studied lots of different micro switches before settling on a "lever type" as this requires the least pressure to make it work and is activated easily by the slim plastic rod on the back of the washer button. So I made adjustable aluminium mounting brackets and mounted the switch and it works perfectly.


Now to mount the Light switch and wiper switch in the dashboard. I had to make a tool to tighten the switch bezels, as they only have two small chamfered slots in them. This I made with a small tube, filed to leave just two small protruding pegs on the end that fit the slots and a long machine screw through the other end of the tube to form a "T" handle. 


Now it's time to mount the washer bottle and true to form the old one leaked. So I had to buy a replacement and then drill it, through where the original pressure valve fitted, to allow the water pipe to enter it. It could then be piped to the pump and up to the new jet at the windscreen. Time for a test. I connected the battery and pushed the button. The pump whirled and water shot out of the jets, straight into my face, as I still haven't fitted the windscreen!!! 


The final test was to fit the spare wheel and check that both the horns and the washer bottle all clear the wheel and that there was still room for the jack. As you can see, everything fits great.


It was at this point that I was thinking about the original wiring and it occurred to me that the main positive cable, which is connected to the starter motor and travels the full length of the car to feed the fuse box, carries all the current for the car's electrics but is not fused in any way. If that wire should ever short to earth then the cable could catch fire. My original idea was to fit an in-line fuse but after investigating I came up with a much better solution. By wiring the cable back to the battery area, I could fit a 60A breaker that would protect the car and be easily reset once the fault was found. So here it is:-

I now decided that it was time to fit the rear window. Now this has been stored safely in the loft since the car was stripped. It was in really bad condition with 50 years of mould and dirt ingrained on the glass. I tried widow cleaning fluid and it didn't touch it. So I went for paint thinners and that didn't touch it either. So I finally used Nitromores paint stripper, which finally did the job. I felt that I was lucky as all of the dirt was on the outside of the glass so I did not have to damage the heated elements on the inside. The next job was to look at the mountings. 

The hinges were great and just needed cleaning and painting, but the mountings that bolt the hinges to the glass  were missing and had been replaced by rusty nuts and bolts. I decided to make new ones and set about the task on the lathe. So with two new aluminium mushrooms, new rubbers and stainless screws on the inside, the hinges could be mounted on the glass. 


The next task was to look at the catch for the rear window and it had a problem.. One of the pivoting legs was broken in half. Being cast, this could not be repaired and so it was either buy a new, very expensive, catch or try to fix it. 


I went for the second option and made a new pivot leg from thick aluminium and the drilled and tapped the body and used cap screws to fix it back together. 


Well, at last, the rear window could be fitted and wired and guess what? The heated screen didn't work. So I had to remove it again and investigate the element. It turned out to have 14 breaks in it.  I went on the internet and searched for a repair kit, which involves conductive paint. I bought 2 kits and set about the repair. Each break was located and painted and then left 24 hours to dry and then re-tested. I had to do this three times before finally having all elements working and being able to re-fit the window.


Well at this point I just wanted to add a bit of trim. Now I had the original Karmann Ghia badge, but it had a really deep groove scored into it in the black area. So I set about filling the groove with black gloss paint. Day after day I added more paint and left it to dry until it was finally filled. I then rubbed it down until smooth and then polished it. And here is the finished result.


On the next episode the hood frame is fitted and the dashboard assembled

Sunday 15 October 2023

24. Karmann Ghia Restoration - Lights & Bumpers


Well while the car was away at the painters, I decided to order a new wiring loom and to my surprise I found that they were made just around the corner from my workshop. So now is the time to fit the new loom threading it from the engine compartment, over the inside left wheel arch into the back of the car and then along the sill and up under the dash board to the fuse box area. That done I could now start fitting the lights and I decided to start at the back, with the number plate light. Inspection of the reflectors revealed that they were in tact but the silvering had gone from them. I had heard of a chrome paint and felt that it may be worth having a go with it to restore the reflectors. So I bought some (which is quite expensive for a small pot) and to my surprise it worked well enough to make the reflectors usable.

So now I could fit and wire the number 
plate light with 
two new lenses and lamps and I couldn't resist fitting the Karmann Ghia badge on the engine compartment lid and it does look nice. So on to the rear lights. Both of the original lenses were cracked, so I had no choice but to buy new ones. The reflectors, again cleaned up nicely with the new paint-on chrome. However, when it came to fitting the lenses to the reflectors, I found that the lenses did not seat properly  on the seals. They bottomed in the centre near the screws leaving an air gap at the top and bottom, which would let in the rain. So I had to set about the new lenses with a Dremel reshaping them until they fit correctly. 

I this point I decided to fit the steering column to allow the wiring from the indicator arm to be connected. I had to dismantle the collapsible section of the column in order to pass the top 

section of the column up the tube, as it is too long once assembled to get up the tube without hitting the bodywork. However, once I figured out how it went together it wasn't too difficult and, once in place, the indicator switch module could be fitted. 

Now on to the front indicators. I managed to
pick up new lenses, rubbers and the right hand reflector. But no one had a left hand reflector. So I had to revert to renovating the old reflector including new mounting studs and again chrome painting the reflectors. Fitting the right indicator was easy and it went on with no trouble. But the left hand one was a different story. Having had replacement metalwork in that area the reflector in it's rubber just would not go in the hole and in the end I had to cut away metalwork until it would fit. That lens and reflector was on and off 8 times but eventually it fit.

Now for the bumpers. As you read earlier,
I had already assembled and fitted them, before the car was painted. So now the trick was to fit them again without scratching the nice new paintwork. I first covered the corners of the wings with duct tape. I then loosened all the the bolts holding the sections of the bumpers together and then passed the two bumper irons through new rubbers and into the mountings in the wheel well and bolted them into place. Now for the difficult bit, I had to fit the new aluminium spacers on the ends of the bumper blades along with rubber washers between them and the bodywork. Once they were all in place, I could then tighten all of the fixing bolts and then remove the protective tape.

Now to repeat the procedure with the rear bumper. Not quite so difficult this time, having worked out how to do it at the front. Along with the bumper I could now fit the rear reflectors. Again I had to replace the fixing studs, which had broken off during removal. Unfortunately one of the side red reflectors was broken and so I had to order a new one and then figure out how to fit it. But they are on and look great.
Finally it's time to fit the 
new headlights. It took a long time to renovate the baskets that hold the sealed beam units. Each had to be disassembled and resprayed and fitted with new springs, so that the headlights could be adjusted correctly. Then with all new rubber seals and the rims re-polished, the headlights could be fitted.  All of these lights could now be wired back to the fuse box. When fitting the fuse box I found that the plastic fixing tabs were broken and it would not hold in place and so I spent a couple of hours making new secure mountings. It's going to be a long slow process wiring the car. I've downloaded several wiring diagrams but as I've decided not to include the diagnostic socket, (Which does virtually nothing), none of the diagrams exactly match the wiring. But I'll get there.

On the next blog I start wiring the dash board.


Sunday 18 June 2023

23. Kermann Ghia Restoration - The Rebuild Begins


So with the body back in my workshop and at last with it's paint in place, it's time to start the slow rebuild. Well there were a couple of jobs to do before mating the body back with the chassis. The first job was to wrap the heater tubes under the back seat. It is much easier to reach these tubes before the body is mounted on the chassis. These tubes are perforated to act as noise reduction and need to be wrapped with insulating material. I had saved the old wrapping, but now they are nowhere to be found. So I decided to find some suitable pipe lagging material to do the job. Two different diameter of lagging were used combined with adhesive aluminium tape and cable ties. As you can see this was successful.

The next job was to connect the bonnet springs to the hinges, as the painter had removed the bonnet to paint it and then could not get the springs back on. These springs are very strong, and after trying several ways of levering the springs with no success, I finally decided to pass a loop of wire through the speedo hole in the dash board, through the loop in the spring and fit a large wooden handle through the loop in the wire inside the car. I could then pull on the handle and pull the spring back towards the dashboard until it snapped into place.
The next job was easy and that required the fitting of the two heater tube extensions. These tubes just required cleaning up and then mounting through the bulkhead to the, now insulated, heater tubes.
It was now time to prepare the chassis and body to be reunited. I first removed the wheels from the chassis and put the chassis on castors, so that I could position it correctly under the body. I then put a bead of sealant all around the rubber seal on the chassis and then, using two bars under the wheel arches, I slowly lowered the body down on the lift, adjusting the position of the chassis as I went, until the two came together.  The next job was to bolt the two together and this required every bolt hole being re-tapped with a 8mm tap. I didn't count them, but I guess there were about 40 of them. I then cleaned all of the clamping plates and used new stainless steel bolts. 

The body mated down well onto the chassis and was bolted into place including the extra fixings to the front axel. I noticed that the door gaps had widened and, after investigating, found that the reason was that I had tightened down the rear body fixings into the rear shock absorber cast mounting brackets and that these needed spacers. So I then had to make some thick spacers to fit between the body and the chassis brackets where the body bolts to the top of the rear shock absorber brackets and the door gaps closed to the correct spacing again.

I could now fit the wheels and the car is now sitting on it's own wheels for the first time in years. You will notice that I have fitted the old wheels while I work on it, keeping the new ones safe and clean until they are needed.;
It's time to fit the new glove box and the bonnet release cable.  This is a relatively easy job, with just a central strap pulling the glove box into place. The pull cable could then be ran to the front of the car and connected to the bonnet catch. So I can now lock and open the bonnet by pulling the lever in the glove box. 
Two more jobs, the hinges could be re-fitted, along with the glovebox lid and a new knob and catch.. It's great to be putting things back on at last!
The next job that I decided to do was to fit the nostril air intake grills at the front of the car. This involved finding the plastic baskets, that fit behind them. After cleaning and painting the baskets they fitted easily with self tapping screws. I then polished the grills and fitted new rubber seals around them and offered them into the holes. I then discovered that the fixing tags on the grills were broken and could not be used to fix the grills into place. So I had to carefully drill the sides of the grills and fix them by screwing self tapping screws through the sides and directly into the bodywork. However the result was excellent, you can't see the fixing screws and the grills fit perfectly.


The next job was one that I had not been looking forward to. Fitting the engine compartment engine sealing rubbers. It would have been great to simply slide the rubbers into their grooves, but nothing is that easy. Even with lots of lubrication the rubbers simply would not slide. So In the end it was the very slow process of levering the rubber into it's groove with a screwdriver centimetre by centimetre. Total time three and a half hours! but they are in and no damage.


I now decided to fit the petrol filler flap release mechanism. I had bought the new complete cable and catch from VW Heritage two year earlier, when the old one had disintegrated during it's removal. Well now was the time to fit it. So I fitted it and pulled the handle to release the flap and it broke! I spoke to VW Heritage and they said, despite the item being new, I had bought it too long ago for it to be under warranty and that I would have to buy another one. I was determined not to buy another one and so set about making replacement parts on my lathe, which took most of the day, but eventually I managed to repair it.
Here you can see the cable fitted under the wing and the petrol filler flap now flips up at the pull of the handle under the dash board.

Lot's more to come, as the car slowly comes together.