Progress has been really slow, over the past few months. Mostly due to my friend, Colin, closing down his business and taking a job elsewhere. So although my Karmann Ghia is still at his factory unit, he is mostly unavailable and the unit is locked up. However some progress has been made and work is continuing, if at a slower pace.
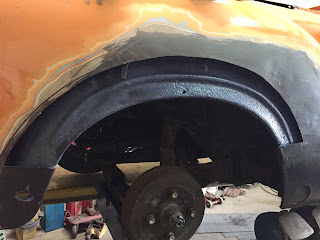 I said, at the end of the last blog, that there was only a couple of small jobs to do and then the body could come off. Well as usual, one of those "small jobs" turned out to be a big job. We were looking at the offside rear wheel arch. Which showed signs of rusting through and waves in the metal where previous repairs had been done and then covered with filler. We decided that as we had repaired all the other bad areas properly, that this area should also have the same approach. So I ordered a new wheel arch panel and we cut out the old damaged area.
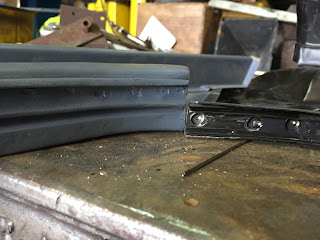
This area was then treated with rust killer and the new panel was welded into place. There are still a few small areas to repair but they are now to be left until the body has been removed from the chassis.
 We have now reached the point that all this replacement of metalwork has been for. When we started work it was immediately apparent that with so much body rot, if we took the body off the chassis, the body would simply break in half and if that happened, our chances of getting the doors to fit, after it was welded back together, was pretty slim. So the bracing bars and all of the replacement panels were necessary to strengthen the body first.
So now it's time to think about removing the body from the chassis. Now in the mean time, Colin has been given some excellent engine stands (shown here in yellow) and with a little modification, we intend to use these stands to mount the body on, once removed from the chassis. This will enable the body to be rotated for the final underside welding and will also remain on the body during the paint spraying process.
So the first job was to devise a method of mounting the body onto the stands and for that we needed supports at both ends of the body.
And here they are. These heavy duty brackets were fabricated and fitted the the bumper mountings at the front and rear. Now once the body is off, these brackets can be mounted onto the stands allowing us to rotate the body as on a "spit roast".
 And so, with all of the bolts removed, that fix the body to the chassis, and three strong men, the body is finally lifted off.
I must admit, it does seem strange to see the body and the chassis in two different places. But this is what we have been working towards.
 So now we can turn out attention to the chassis. Now both chassis pans are rotten and I had bought replacement pans some time ago and it was now time to unwrap them. To my surprise, although both had come from VW Heritage, they were quite different from each other. The right chassis pan seemed correct in every aspect, but the left one had no body mounting holes in it, no jacking point reinforcement, no captive nuts and a strange extra curved pressing that you can see on the front foot-well area. I spoke to VW Heritage and they were as puzzled as me. However they arranged to collect the rogue panel and send me a replacement. Great Service.
 The next job was to remove the seat runners. This sounds like a small job, but it actually massive and very complex. Firstly you have to take very careful measurements of their position on the chassis and each of the three pieces relationship to each other, as there are no marked mounting points on the new chassis pans. Get it wrong and the seat won't fit or slide. Then you have to drill out hundreds of spot welds in order to remove the seat rails and their cross-member.
 Now with the seat runners removed the old chassis pans can be cut out. I have removed the background from this picture to make it easier to see just how much has to be cut away leaving only the backbone of the car ready to receive it's new panels.
It now took hours of slow and laborious work to prepare the skeleton chassis ready to receive the new floor pans.
But things look a lot better now that the new floor pans are in place and ready to receive the old seat runners.
 Runners measured for position and clamped into place.
 The slow job of welding up hundreds of holes made drilling out the original spot welds.
Well that's one side done. Now I've got to do it all over again on the other side.
Well that's the progress so far, here's hoping that things will move a little faster over the winter months.
You can contact me on hopcroftscoot@gmail.com
Copyright 22.09.19 all rights reserved.
My Other Blogs:
1961 BSA A10 Super Rocket Motorcycle:
http://60sclassicmotorbikes.blogspot.co.uk/2012/07/before.html
1961 Ariel Arrow Super Sport Motorcycle :
http://60sclassicmotorbikes.blogspot.co.uk/2014/01/1961-aerial-golden-arrow-restoration.html
Miniature Land Rover Defender:
http://miniaturelandrover.blogspot.co.uk/2016/02/1-miniature-land-rover-defender-idea.html?view=timeslide
Motorcycle Trailers / Caravans:
http://motorcycletrailersandcaravans.blogspot.co.uk/2018/01/1-motorcycle-trailers-problem.html
It's been a long time since the last blog on my 1971 Karmann Ghia Convertible restoration. It's not that I haven't been working on it. It's just that things have not been going so well, as you will read later, and I had to wait until significant progress could be reported.
Well, as you can see, from the picture above, the right side rear quarter went together quite well and the inner wing was also rebuilt. And so it was time to move to the back of the car and the engine compartment.
Now Colin (my friend who is doing the bodywork with me) said that from now on "the work would be easy". He really should not have said that. All we had left was the final 4 body panels and that just involved cutting out the old ones and welding in the new ones.
The four panels involved were the left and right engine compartment side trays, the rear engine compartment tray and the rear valance.
So, as you can see, we proceeded with great confidence and cut them out.
The next job was to fit the engine compartment lid so that the gap around it could be set and then offer up the rear valance.

With the rear valance in place, the distance between the two rear wings was now set and we could proceed with the engine panels.
The first job was to weld the valance to the back engine tray. These we spot welded together and at this point things were going well.
Then we tried adding the engine side trays and found that they did not fit. I had bought the rear tray and valance from VW Heritage in the UK but could find no one in the UK who had the side trays. After searching the Internet I found the two side trays in Germany and ordered them in.
At first glance they looked good but now it was apparent that they were not correct at all. My first instinct was to search again, which I did, but no one had any more panels.
 The main problem was where the tray meets the inner wheel arch. Between the flange on the tray and the inner wing was a gap of up to 25mm (1"). I started to look at pictures on the Internet of Karmann Ghia engine compartments and discovered that where my inner wings have an indentation, all of the ones in pictures were rounded and would have fit these panels. Could it be that my Karmann, being Brazilian, was different from the German ones? What ever the answer I was stuck with the problem. These are the trays that I've got and no others are available. So somehow we've got to get them to fit.
 Just when we thought this was bad enough, we noticed something else. The engine seal runners on the side trays were in different places from the seal runner on the rear tray. The picture on the right shows the two trays upside down, laying on the bench, so that the top surfaces which you see in the engine compartment are level with each other. You can see that the seal runners don't line up at all.
 We referred to the panels that we had cut out and found that the original seal runners were in the position shown on the new side trays.
So now we had the task of removing the runner from the rear tray, extending the trays flange and then welding the runner back on again. And, to make things worse, the runner on the rear tray was also the wrong shape. So we had to make a tool and reshape the runner to match the side trays.
 Finally the trays could be welded together and into the car, but this still left the problem of the large gaps between the side trays and the inner wings. Colin and I talked about this at length. His idea was to box over the hole from the top of the flange on the tray to the wing, leaving a low shelf. My idea was to cut the flange off the tray and weld a new flat piece onto the tray. We were not really happy with either idea, as it would be obvious that they were a compromise. Then Colin came up with an alternative. That was to make and fit sloping panels down from the inner wings to the trays. In effect swageing them in.
To see what it would look like, cardboard templates were made, held in place with masking tape and sprayed with primer. They looked excellent and so Colin now had to make these very complex shaped panels. This took some time, but here they are.
It was then a case of fitting them in place and TIG welding them in. A coat of primer and the finished job looks excellent.
Well the car is now solid, all steel and no filler and there's only a couple of small jobs to do now and then the body can come off.
You can contact me on hopcroftscoot@gmail.com
Copyright 16.04.19 all rights reserved.
My Other Blogs:
1961 BSA A10 Super Rocket Motorcycle:
http://60sclassicmotorbikes.blogspot.co.uk/2012/07/before.html
1961 Ariel Arrow Super Sport Motorcycle :
http://60sclassicmotorbikes.blogspot.co.uk/2014/01/1961-aerial-golden-arrow-restoration.html
Miniature Land Rover Defender:
http://miniaturelandrover.blogspot.co.uk/2016/02/1-miniature-land-rover-defender-idea.html?view=timeslide
Motorcycle Trailers / Caravans:
http://motorcycletrailersandcaravans.blogspot.co.uk/2018/01/1-motorcycle-trailers-problem.html
It's time to look at the second side of my 1971 Karmann Ghia Convertible. I was full of hope for this right side as the paintwork showed very little signs of rust and the accident damage that was discovered on the left side of the car did not extend to the right side. Just maybe the right side would be much easier to do than the left.
Closer inspection showed just a little rust bubbling on the sill and at the bottom of the front and rear quarters, and so it was with great confidence that the task of replacing the right had sill began.
 Colin, of Unit Two Services, Ilkeston, Nottingham, (who's workshop I am still occupying) set about the sill with an angle grinder to see what secrets hid beneath. It was not good news! The strengthening beam had rotted away along with the bottom of the "A" pillar and the rear inner wing. The decision was made to cut away the bottom of the front wing and the bottom of the rear quarter panel and see how far the rot had gone..

The more we cut away, the worse it got.

Until our hopes of an easy restoration on the right hand side disappeared. Not only was the strengthening beam rotten but also the back of the heater tunnel and the heater tunnel itself.

Until the only decision had to be that another full reconstruction had to be done on this side as well. So everything was cut away, back to the chassis itself and reconstruction had to commence again.

 At last a stroke of luck! When Colin made the heater tunnel for the left side, he also made another blank one for the right side, just in case. Now we had got to use it. So the holes were cut in it for the front heater vent and the oval hole for the heater tube under the rear seat. The replacement tunnel was then fitted into place and marked, through the floor pan, for the fixing plates and captive nuts. The new heater tunnel could then be bolted into place along with a new rear inner wing end plate and front "A" pillar end plate.
At the same time the repaired perforated rear heater tube had to be fiddled into place, because once the heater tunnel is bolted in you can no longer fit this tube. Once the tunnel is bolted in, the tube can be welded to the tunnel and to it's mating tube at the other end.
Now once the heater tunnel was back in place, the back of the tunnel and the new strengthening beam could be welded in and the car was now regaining some of its strength.

Now, at last, the new sill could be fitted and welded into place.

It was now time to turn our attention to the "A" pillar. Behind the lower hinge is a shaped box section that adds strength to the bottom of the pillar. This prevents the car bending at the crucial place, where the vertical pillar meets the sill and also supports the door. You would never see this unless you cut away the bottom of the front wing to reveal it. Care had to be taken when rebuilding this to ensure that it was both strong and did not hit the inside of the new bottom wing outer panel.
The new bottom wing panel could now be fitted. Care was taken to cut this new panel in below the indentation for the Karmann Ghia badge as I still have this badge and want to refit it once the car is painted.
So there it is we are nearly there with the right side. Just the rear inner wing to construct and a new rear quarter panel to fit and then, at last, we can move onto the rear of the car.
You can contact me on hopcroftscoot@gmail.com
Copyright 14.01.19 all rights reserved.
My Other Blogs:
1961 BSA A10 Super Rocket Motorcycle:
http://60sclassicmotorbikes.blogspot.co.uk/2012/07/before.html
1961 Ariel Arrow Super Sport Motorcycle :
http://60sclassicmotorbikes.blogspot.co.uk/2014/01/1961-aerial-golden-arrow-restoration.html
Miniature Land Rover Defender:
http://miniaturelandrover.blogspot.co.uk/2016/02/1-miniature-land-rover-defender-idea.html?view=timeslide
Motorcycle Trailers / Caravans:
http://motorcycletrailersandcaravans.blogspot.co.uk/2018/01/1-motorcycle-trailers-problem.html

 I said, at the end of the last blog, that there was only a couple of small jobs to do and then the body could come off. Well as usual, one of those "small jobs" turned out to be a big job. We were looking at the offside rear wheel arch. Which showed signs of rusting through and waves in the metal where previous repairs had been done and then covered with filler. We decided that as we had repaired all the other bad areas properly, that this area should also have the same approach. So I ordered a new wheel arch panel and we cut out the old damaged area.
 We have now reached the point that all this replacement of metalwork has been for. When we started work it was immediately apparent that with so much body rot, if we took the body off the chassis, the body would simply break in half and if that happened, our chances of getting the doors to fit, after it was welded back together, was pretty slim. So the bracing bars and all of the replacement panels were necessary to strengthen the body first.

 And so, with all of the bolts removed, that fix the body to the chassis, and three strong men, the body is finally lifted off.
 So now we can turn out attention to the chassis. Now both chassis pans are rotten and I had bought replacement pans some time ago and it was now time to unwrap them. To my surprise, although both had come from VW Heritage, they were quite different from each other. The right chassis pan seemed correct in every aspect, but the left one had no body mounting holes in it, no jacking point reinforcement, no captive nuts and a strange extra curved pressing that you can see on the front foot-well area. I spoke to VW Heritage and they were as puzzled as me. However they arranged to collect the rogue panel and send me a replacement. Great Service.
 The next job was to remove the seat runners. This sounds like a small job, but it actually massive and very complex. Firstly you have to take very careful measurements of their position on the chassis and each of the three pieces relationship to each other, as there are no marked mounting points on the new chassis pans. Get it wrong and the seat won't fit or slide. Then you have to drill out hundreds of spot welds in order to remove the seat rails and their cross-member.


