Wednesday 16 November 2022

22. Karmann Ghia Restoration - Paint


Following my last blog, I decided that I had to put the body back on the chassis to ensure that the new wheels would fit under the wings, before I sent it off for painting. So I had to devise a way of lifting the body onto the chassis on my own. 

The answer was to lift the body with my car lift, using poles across under the body and then position the chassis under the lift, put the chassis on castors and remove the wheels.

Now the chassis could be positioned in exactly the right place, using the stands on castors, and the body slowly lowered into position. 


Now with the body on the chassis, I could try fitting the new wheels and tyres and, at last, some good news. The wheels fit!! Brilliant. So now I can take the body off again, put it back on the rotating spits and get it off for painting. 


I decided to fit the bonnet and boot catches before sending the car away as they tend to fall open and hit the stands when the body is turned upside down. This posed two problems; The boot (engine cover) lid catch requires a pull wire to operate the catch and this was missing (The previous owner just had a bit of wire under the rear bumper to open the catch). I managed to buy a pull cable and knob but could not get any kind of mounting boss for it so I decided to make one. This worked and the engine cover lid can now be released by pulling the knob inside the car.

The front bonnet release posed another problem, as the bonnet release lever is mounted on the glove box and, as you can see, the glove box was beyond help. 


The answer was to buy a new plastic glove box and mount the original lever and cable onto it. As you can see, this was successful, but posed another problem. As the new glove box won't be fitted until after the body is painted, how can I provide a bonnet release to open the bonnet with no glove box fitted? The answer came to use the old wire from the engine cover release and mount it through a hole in the inner wing with a pull under the wheel arch. 


So the Karmann Ghia body finally went off for paint in February 2022 and that gave me the opportunity to do some other small jobs ready for when it returns. 

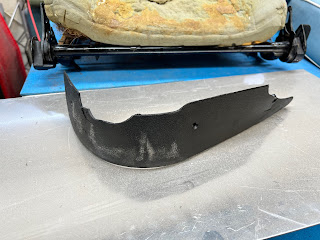
The first was the seats. I wanted to fit them to the rails on the chassis and make sure that they slide and adjust correctly. Well this was great and they slid on quite easily and adjusted fine. However I then noticed that the two black plastic kick guards on the bottom of the seats were both broken. 


So I tried to buy some new ones with no success, I looked on all the web sites world wide, but no one had any. So I decided to make some out of aluminium.


What do you think?


The next job was the Tow Bar. It is my intention tow my box trailer with the Karmann, when it is done, to allow me to take my bikes and the car to vintage shows and show them all. Well getting a tow bar was difficult, but I finally manged to buy one for a beetle. Now once the body is back on the chassis, I will probably have to cut the ball off the bar and extend it to reach the back of the Karmann. However, in the mean time I needed to manufacture the fixings for the tow bar which did not come with it. So I made two new "U" bolts to fit over the torsion tubes and two heavy right-angle brackets for the gearbox mounts. 

Whilst doing these preparation jobs, the body has now been at the paint shop for 6 months (They said it would take two months) and I got a call to say that they had decided that they had "Bit off more than they could chew" and would I please take it away! They had managed to get it into "filler coat" but that was it. Furious, I had to organise the relay truck to take it away again and bring it back to my workshop.

So I had to track down another man who could finish the car and arrange to deliver it to him. So on 17th September 2022 the Karmann body went, on the relay truck again,  to the second painter, called "Coolblu" in Swadlingcote. 

In the mean time, I decided that it would be a good idea to change the generator, on the engine, for an alternator. So I bought the kit and set about fitting it. As you can see, this went well, and apart from having to cut a small boss off the oil filler stand, it fitted perfectly.


Finally, last night (15th November 2022) I went to pick up the painted body and it is beautiful. It's now back in my workshop and ready for the long reassembly.


On the next blog, I hope to have the body back on the chassis.

Copyright 16.11.22 all rights reserved.

My Other Blogs:
1961 BSA A10 Super Rocket Motorcycle:
http://60sclassicmotorbikes.blogspot.com/2012/07/before.html

1961 Ariel Arrow Super Sport Motorcycle :
http://60sclassicmotorbikes.blogspot.com/2014/01/1961-aerial-golden-arrow-restoration.html

Miniature Land Rover Defender:
http://miniaturelandrover.blogspot.com/2016/02/1-miniature-land-rover-defender-idea.html?view=timeslide

Motorcycle Trailers / Caravans:
http://motorcycletrailersandcaravans.blogspot.com/2018/01/1-motorcycle-trailers-problem.html


Saturday 22 January 2022

21. Karmann Ghia Restorations - The Doors


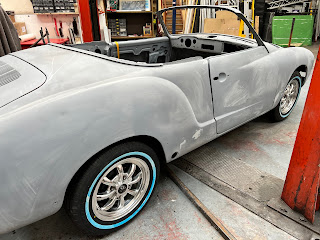
Well it's been a very long time since my last blog and progress has been very slow, mostly due to Covid lockdown. But I am finally making progress. As I mentioned on my last blog, my next job was to weld new pieces of metal onto the kickboards under the rear seat. This was done and painted and looked OK. 

I was then looking at my new wheels and the wheel well at the front of the car and decided to try one of the new wheels into the hole. Well surprise surprise, it didn't fit! The new wheel and tyre being bigger would not go down into the well and the horn support bracket and jack clamp all got it the way. Well there was nothing for it but to remove both brackets and then panel beat the inner wings on both sides to widen the wheel well. 


That done I could then try the new wheel in the well and find a new position for the jack clamp and weld it back into place. I then had to design and make a new horn bracket and try that in place with the horn attached to ensure that it would not foul the spare wheel. Designing the new horn bracket was more complicated than I had expected as I had to ensure that I could adjust it's position, with the horn on it, with the spare wheel in place. This involved drilling a hole in the bodywork and bolting the new bracket in place, then turning the bracket until everything cleared the wheel. Once in the right place, the bracket could be welded in place. The bolt could then be removed and the hole welded up again. But there it is, done.


Now the job I have not been looking forward to. The doors. Inspection of the doors showed rot at the bottom of each door, but this only required plating and welding. The main problem was down the slot on the top where the window passes through. Just inside this slot are two plates, one on each side. These plates carry 7 rubber buffers, that fit either side of the window to stop it rattling. The holes that carry these buffers had rotted away. I had no choice but to cut open the top of the doors and make new plates. Here you can see the door cut open and one of the new plates held in place ready for welding. I was lucky when making the plates that my small press was just wide enough to do the small bend along the top edge. The holes that you can see in the new plate for the buffers were drilled right through with the door. The other holes, only in the new plate, are for welding through to hold the plate in place.

The top of the door then had to be carefully welded back on again and refinished to a smooth condition. The whole process then had to be repeated for the other door. 


The whole process took days  but in the end the doors were fit to spray and use.


Finally the doors could be fitted to the body to see if they still fit and amazingly, they do!! I then had to look at the chrome trim fixing holes down the side of the body. Now the ones in the doors were still there but most of the ones on the replacement body panels were missing. So, to get them in the right places, I used a laser to project a straight line onto the side of the body, passing through as many holes as possible and then marked and drilled the new ones in place. It's interesting to note that the indentations on the replacement panels, for the holes, were all in the wrong places.


I could now refit the rear boot lid and that just leaves the bonnet (Hood) to be fitted and the body can go off for paint.

So, I have actually booked the body in for paint in two weeks time. 

Now having booked that, it has now occurred to me that, as I had so much trouble getting the spare wheel to fit, will the new wheels and tyres fit under the wheel arches?? So my next job is to fit the body onto the chassis and try the wheels in place. FINGERS CROSSED!!