Well sorting out the minor faults after the car's short run didn't take much doing. The problem with the gear change turned out to be that I had fitted the striker plate back to front and upside down. Once turned over and reoriented the gear change worked perfectly. I also took the opportunity to fit a "Quick Shift" under the gear lever which shortens the lever travel and makes it more positive. The Headlights too were an easy fix. The reason that they were on all the time was because a small 6mm nut had fallen across the back of the fuse box giving the headlights a permanent feed. The spacing on the steering wheel required the making of an aluminium spacer, bringing the steering wheel 20mm further forward and that sorted out all of the test drive problems.

I then thought that I would try the carpet set, that I had bought second hand, in the car and the result was very disappointing. As you can see from the photo, they didn't fit very well and left a gap between the end of the carpet and the rear seat support. The other pieces I tried weren't much better and I made the decision to sell them on Ebay and have some carpets made.
Now I had never been very happy with the condition of the original aluminium sill protectors and so decided to have some stainless steel ones made with the Karmann Ghia logo laser engraved into them. So I had the blank metal plates made and polished them to mirror finish in my workshop. I then drew the artwork on computer and and took the plates to a laser engraver in Leicester. Two weeks later I had these beautiful sill protectors fitted on the car.
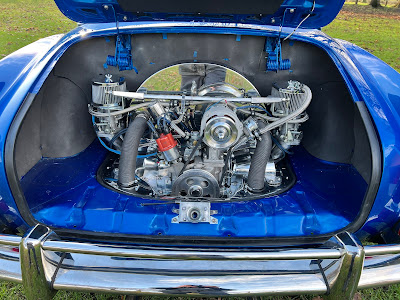
You know what it's like, just when you think things are going well, something always goes wrong. I was running the engine and tuning the carburettors when I looked under the car and there was a huge pool of oil on the floor. "BIG TROUBLE". It meant removing the engine again and investigating.
After stripping off all the tin-ware I found that the area around the oil cooler was where the problem was and after removing the oil cooler, I found a seal with a damaged edge. So I fitted new seals and rebuilt the engine and put the engine back in again. I ran the engine and it still leaked !! (Oh Bother ***!!!****, I said). So the engine had to come out again.
This time, I read that some of the oil cooler seals were softer than others and so went through my collection of seals and found the recommended harder seals and fitted them. I rebuilt the engine again and fitted it back in the car. Guess what? It still leaked.
Engine out for the third time, this time damaging the new seal around the rear valance (I had to buy another new one, and stripped the engine for the third time. This time I checked the oil cooler itself, which was brand new. I pressurised it and it showed no sign of leaking. So I rebuilt the engine again, this time using a different sealant (Silicon) and refitted it back in the car yet again.
No luck. It still leaked!!!
So I decided to do the unthinkable. I took the engine out for the fourth time and stripped off the tin-ware and then re-fitted the engine back into the car with no cooling and ran the engine.
It leaked, but now I could see where the oil was coming from and it was the new oil cooler. Whilst it had stood up to the pressure test OK, once it had hot oil running through it under pressure it leaked from the core. I later discovered that this is a common fault with these replacement oil coolers. Fortunately I had not thrown away the original, 53year old, oil cooler. So I cleaned it and flushed it out and fitted it back on the engine. I then re-fitted the engine back into the car, still with no cooling, and ran the engine, to check for leaks. It didn't leak. Hooray!!Now the engine had to come out for the fifth time so that I could re-fit all of the tin-ware and
finally it could be fitted back into the car and tested.
At last it did not leak.
I had had to postpone the car's trip to the trimmers due to the oil leak. So now I had a date and had to get it ready. The new hood had arrived from Holland, which I laid over the frame, to make sure it fitted, and it did and looks good.
So Now I needed to look at the back seat. When I bought the car, it had no back seat, with just a board covering the hole. I had bought a second hand back seat on the internet but found that, when I tried it in the car, it was too big. It was for a saloon not a convertible. So I had to strip off the outer skins and shorten the length of both the squab and backrest including the foam. I could then fit the hinges and make sure it folded correctly
On Friday 18th October 2024 I gave the car it's maiden voyage on it's 9 mile trip to the car trimmer. It behaved beautifully. Now it's Ian Cherry's job to fit new carpets, retrim the seats and door cards and fit the new hood.
I shall be popping down every week to see how it is progressing.
Copyright 22.10.24 all rights reserved.
My Other Blogs:
1961 BSA A10 Super Rocket Motorcycle:
http://60sclassicmotorbikes.blogspot.com/2012/07/before.html
1961 Ariel Arrow Super Sport Motorcycle :
http://60sclassicmotorbikes.blogspot.com/2014/01/1961-aerial-golden-arrow-restoration.html
Miniature Land Rover Defender:
http://miniaturelandrover.blogspot.com/2016/02/1-miniature-land-rover-defender-idea.html?view=timeslide
Motorcycle Trailers / Caravans:
http://motorcycletrailersandcaravans.blogspot.com/2018/01/1-motorcycle-trailers-problem.html


.jpg)


